


Kubernetes LXC Containers Configuration – Lab Setup
Building out a Kubernetes lab is a great way to learn the technology. I am a huge advocate of lab environments. Building out a Kubernetes lab can make use of many different types of infrastructure in order to build out the lab. I recently posted about how to easily spin up a Kubernetes lab using (3) vSphere virtual machines, running Ubuntu 20.04. If you want to have an even more concise lab using a single virtual machine, you can use LXC containers as the platform for housing your master and worker nodes. It is a great way to learn containerized technologies as well as Kubernetes. Let’s take a look at Kubernetes LXC containers configuration lab setup and see how you can effectively configure a Kubernetes lab environment inside nested containers.
Why Kubernetes LXC containers?
Using LXC containers, you can essentially use one Ubuntu 20.04 virtual machine, install LXC, and have a quick way to spin up your three nodes to build out a basic Kubernetes lab with one master node and two worker nodes. In case you are wondering about LXC containers, what they are, and how you can start using them, read my post LXC container management GUI installation and configuration which shows how to get started with LXC and also how to get a GUI management interface running for managing your LXC containers.
So, I will start from the standpoint that you already have LXC installed and initialized on your Ubuntu VM. I am using Ubuntu 20.04 in the lab environment currently. The great thing about LXC containers nested inside your Ubuntu 20.04 host is they are extremely quick to spin up. They are more fully featured than an application container that you may have seen most commonly with Docker and they give you access to the full Ubuntu operating system.
Kubernetes LXC container prerequisites
LXC makes use of what it calls profiles that can control the provisioning of the underlying containers that are launched. in the profile, you can configure limits on CPU and memory as well as a few other tweaks you will want to put in place so Kubernetes works. Note the following configuration items:
- limits.cpu
- limits.memory
- limits.memory.swap
- linux.kernel_modules
- security.privileged
- security.nesting
Also, make sure you note the configuration of the network devices. You will want to make sure you have the entries for:
- nictype: bridged
- parent: lxdbr0
- type: nic
If you don’t have the network configuration configured correctly in the profile, your master node will provision, however, the worker node provisioning will fail trying to communicate with the master node during the kubernetes cluster join operation.
config:
  limits.cpu: "1"
  limits.memory: 1GB
  limits.memory.swap: "false"
  linux.kernel_modules: ip_tables,ip6_tables,nf_nat,overlay,br_netfilter
  raw.lxc: "lxc.apparmor.profile=unconfined\nlxc.cap.drop= \nlxc.cgroup.devices.allow=a\nlxc.mount.auto=proc:rw
    sys:rw"
  security.privileged: "true"
  security.nesting: "true"
description: Kubernetes Lab Profile
devices:
  eth0:
    name: eth0
    nictype: bridged
    parent: lxdbr0
    type: nic
  root:
    path: /
    pool: default
    type: disk
name: k8s-config
used_by: []
Copy and Edit your Kubernetes LXC container profile
You will need to copy the default profile, edit it to include the changes shown above, and then save it. Each of the Kubernetes nodes (master and workers) will be launched with the customized profile.
lxc profile copy default <your profile name>
After copying the default profile, you can either copy the whole code listed above, or simply add the code outlined and underlined below.

After you copy and edit the profile, you can list these out by the following:
lxc profile list
Launching LXC containers for Kubernetes nodes
Now that we have the Kubernetes LXC containers profile in place that contains the customized settings, we can launch LXC containers with the custom profile. The syntax for that is below:
lxc launch ubuntu:20.04 kmaster --profile k8s-config
lxc launch ubuntu:20.04 kworker01 --profile k8s-config
lxc launch ubuntu:20.04 kworker02 --profile k8s-config
As you can see below, we have launched the master and the two worker nodes. You can list out the nodes using the command:
lxc list
Bootstrapping Kubernetes LXC containers
You could manually connect to each node and run the commands needed to install Docker, additional packages, and other tweaks needed to run the Kubernetes cluster initialization. However, I want to point you guys to a great resource for a bootstrap shell script that can easily be piped to your LXC containers. Be sure and bookmark “JustMeandOpenSource” Git repo for Kubernetes. He has a great bootstrap script and other resources to get up and running quickly with Kubernetes in LXC containers.
After cloning the Git repo, you can pipe in the bootstrap-kube.sh script to each LXC container like this:
cat bootstrap-kube.sh | lxc exec kmaster bash
cat bootstrap-kube.sh | lxc exec kworker01 bash
cat bootstrap-kube.sh | lxc exec kworker02 bash
Below is a look at the bootstrap output on the master node. The way the script is built, you will need to deploy the script on the master node first, and then run the script on the two worker nodes after the Kubernetes cluster master has been provisioned.

After performing the process to bootstrap all three nodes, you should see your three Kubernetes cluster hosts come online and joined to the cluster. At this point they are ready for workloads. You can copy out your kubectl config file from the master node from the /etc/kubernetes/admin.conf file to your host or another workstation with kubectl loaded. This allows managing the cluster remotely.
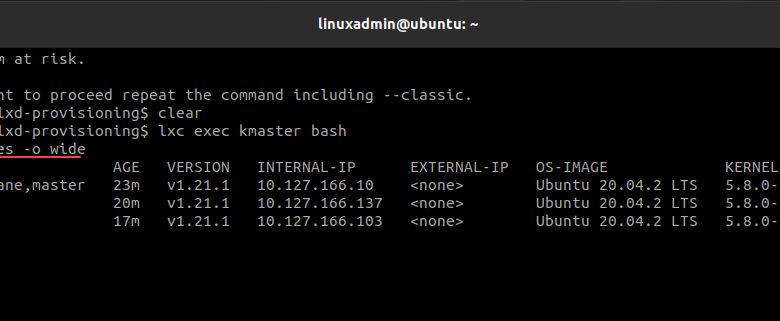
You can view your Kubernetes cluster node details using the following command for detailed output:
kubectl get nodes -o wide
Wrapping Up
Using Kubernetes LXC containers for a Kubernetes lab is a great way to quickly spin up Kubernetes cluster hosts without the provisioning time of spinning up “fat” VMs for the purpose. Also, you can use a single VM to contain the LXC containers nested underneath. After you have launched one LXC container, the next launch is almost instantaneous once the image is pulled down from the repository. This makes building and tearing down Kubernetes clusters extremely easy with minimal resources and definitely facilitates learning.